
FIRST THING YOU NEED TO KNOW …
Decals can be made on both CLEAR and WHITE waterslide decal film.
CLEAR TRANSFER FILM is ONLY recommended for LIGHT surfaces unless you want to paint the area a lighter color wear the decal will go if you place decals on clear film on a dark surface it will likely disappear.
WHITE TRANSFER FILM is perfect for dark surfaces the only drawback is the need to cut them out as the white will show if it is not removed where it is not wanted. Most customers prefer WHITE waterslide decals so unless noted otherwise everything I sell ship on WHITE by default.
How to apply the direction for WHITE waterslide paper.
STEP 1: Very carefully cut out the image with a pair of scissors or an X-acto knife. These are printed on white decal waterslide paper, cut out very carefully around the image, if you leave any border around the image they will show.
STEP 2: Once the decal has been cut out, place the decal into a bowl of water for about 30-60 seconds. Check to see if it needs a little more soak time, some large decals may. DO NOT over soak the decal it can cause ink separation from the paper. Before you place the decal onto your project, dampen the surface of your project with a little water. This will allow you to move the image easily so you can position it in the right place.
STEP 3: If you have soaked the decal for long enough, you will be able to feel the backing paper and decal transfer easily slipping. (Do not remove at this stage) Take the decal out of the water and place it facing up onto your project. Then carefully slip the decal paper slightly and attach the lip of the decal on the surface.
STEP 4: Then gently pull the backing of the paper away leaving the decal transfer to stick to the surface while supporting the decal at the same time with your other hand.
STEP 5: Once the decal has been attached to the surface, move it around to the desired position. Once you have positioned the decal, use a lint free cloth to remove any water or air bubbles underneath the decal transfer. You need to handle the decal with care at this stage, as it is very fragile.
STEP 6: Use a decal setting solution (Solvaset, MicroSol) to snug down the decal and ad in conforming to the texture of the surface.
STEP 7: If you leave it out to dry, the decals will dry in 3-4 hours depending on temp and humidity. You can speed this with a hair dryer, but use caution as it can also cause the decal to shrink or deform if it gets to hot.
TIPS!
TIP #1 – One of the rick I use is to press my thumb down on the decal and roll my thumb (like a finger print) to force the water out from under it. This will not only give the decal better contact with the model but on textured surfaces like brick it will allow the texture to show through giving it more of a painted on look. you might want to test this technique on a spare decal first as it can be a little tricky until you get the hang of it and you can lift the decal off and possibly damaging it.
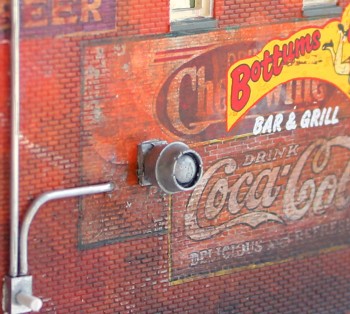
TIP #2 – Use your brick color and put washes of paints over the decal to give it the ghost look as if it has been there for several decades and not that newer advertising is often painted over old advertising created the layer effect. Naturally the bottom decal will be more weathered then the top. So I put one on and weather it down then I’ll place one on top of it and weather again building up to the newest and least weathered decal.
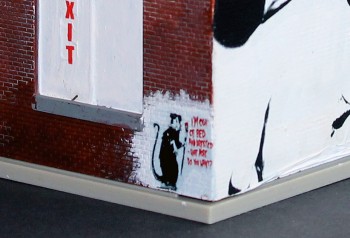
TIP #3 – For graffiti (or any really) type decals on a white background I will paint the area I’m placing the decal with white paint or what ever color the decal happens to be to appear to have been painted by your scale people and when dry I’ll place the decal on top and weather or not as needed.
TIP #3a – If the decal does not have definable straight edges I do not cut them straight because straight lines are easier to notice than irregular edges. So I will cut them curvy or ragged but never straight.

Dave, interesting facts that you have presented here. Can’t wait to apply them to good use. Your tips and suggestions are very much appreciated. 😀…
Do you have an Instagram or a gallery of pics?
Right on the front menu is a link to the galleries. No Instagram. Thanks
thanks for your service !!